
Let’s Draw a Ladybug!
Calling all superstar artists – it’s time for an epic ladybug drawing adventure! 🎨 Grab your sketchbook and coloured pencils because today, you’ll learn how to draw a ladybug and the coolest, cutest one in town!
Even if you’ve never picked up a crayon, you can create this dazzling bug step-by-step🖌️ This easy peasy ladybug tutorial will boost your skills faster than you can say “Spots!” In no time, you’ll have an army of spectacularly spotted insects. So what are you waiting for? Transform into the ultimate bug drawing wizard! Let’s do this! 😎🐞
Follow the steps below to draw a buzz-worthy ladybug that will make your whole family say “Wow!” Whether you’re a growing insect expert or simply want to surprise your parents with an artistic masterpiece, this ladybug is sure to impress.
Learning to draw is fun at any age, so grab someone you love and get ready to create the most awesome ladybug art around. Let’s get creative, have a blast, and make a memory that will stick around like a bright red spot! 🎉✨

Step 01: Let’s Start Learning How to Draw a Ladybug with a Circle! (Sort of)

Grab your favourite drawing tool because we’re diving right in! To kick things off, let’s draw a big, upside-down egg shape with a flatter end at the top. This will be the main body of our lovely ladybug. Don’t worry if it’s not perfect – the best part about art is making it your own! Remember, every artist has their own special touch. 😊🐞
Helpful guide: The green lines are a handy guide for you to know what’s next!
Looking for how to draw a ladybug step by step? You’re in the right place! Keep following along for a fun and easy guide.
Now, on to the next step! 🎨
Step 02: Divide and Conquer!

Look at you go! Now that we have our ladybug’s body, let’s add a straight vertical line right down the middle. This line will help us make our ladybug look the same on each side and show where her wings separate. Imagine it’s like a zipper, keeping the wings together! 🐞💼
(Pro tip: When searching for how to draw a ladybird, symmetry can be a fun trick. The line helps to keep everything balanced on both sides.)
Ready to continue our artsy adventure? Let’s do it! 🚀🎨
Step 03: Time for the Top Hat! 🎩

You’re doing amazing! Now, at the very top of our egg shape, let’s add a cute little curved line. Think of it as a teeny-weeny hill or a stylish top hat for our ladybug. This part will become the neck and head of our lovely ladybug, where all her brilliant bug thoughts happen! 🐞💭
If you’re on the quest for how to draw a ladybug easily, adding these tiny details can make a big difference. It brings our bug buddy to life!
Keep up the fantastic work! Let’s buzz on to the next ladybird drawing step! 🐞🌼
Step 04: A Fuller Hat!

Well done, mega artist! Our ladybug is taking shape step by step. Now, it’s time to enhance the ladybug’s head. Let’s make it slightly fuller and rounder. We’re giving our bug a more prominent and adorable forehead by drawing a larger, gentle curve over the previous one. It’s like our ladybug decided to wear a bigger hat today!
Remember, in the magical world of art, it’s all about layering bit by bit. These small touches can transform our simple sketches into lifelike wonders. 🐞✨
High-five to you, my creative comrade! Onto the next exciting step in learning how to draw a ladybug! 🎨🖌️
🌈 Step 05: Antenna Alert! 🌈

Hooray! Our ladybug is starting to look even more lifelike. In this step, we’ve added some cute little antennae! These are essential for our little bug friend to sense its surroundings and help the ladybird feel and hear. Here’s how to think about them:
The antennae sprout from the forehead, right above the ladybug’s eyes (which we’ll probably add in future steps).
They’re slightly curved, giving them a playful and animated look. Think of them as the ladybug’s way of expressing curiosity!
The rounded tips on each antenna not only look adorable but are true to the anatomy of many bugs.
Such tiny details can add so much character and life to your drawing. Our ladybug seems like it’s about to explore a luscious garden, sensing its way around with those antennae. 🐞✨
Keep up the creativity! Ready to move on? 🖌️🎨
Step 06: Eyes on the Prize!

Aww, our little ladybug friend just got a lot more expressive. Those eyes seem to be looking right at us with curiosity and charm. Let’s break down what’s new:
The eyes are placed right on the head, below the antennae. This gives our ladybug a cute and friendly appearance.
All that’s needed are two simple circles. The positioning of the eyes gives our ladybug a curious and alert look.
Notice the distance between the two eyes, emphasising the width of the ladybug’s face.
Those eyes indeed breathe life into our drawing, don’t they? With just a few simple strokes, our ladybug has gone from a shape to a character with emotions and personality. Feel free to add some cartoon pupils in the eyes.. this is your super creation!
Fantastic job so far! Keep going, and soon we’ll have a complete, adorable ladybug. 🐞💚 Are you enjoying learning how to draw a ladybird?
Step 07: Stepping Out!
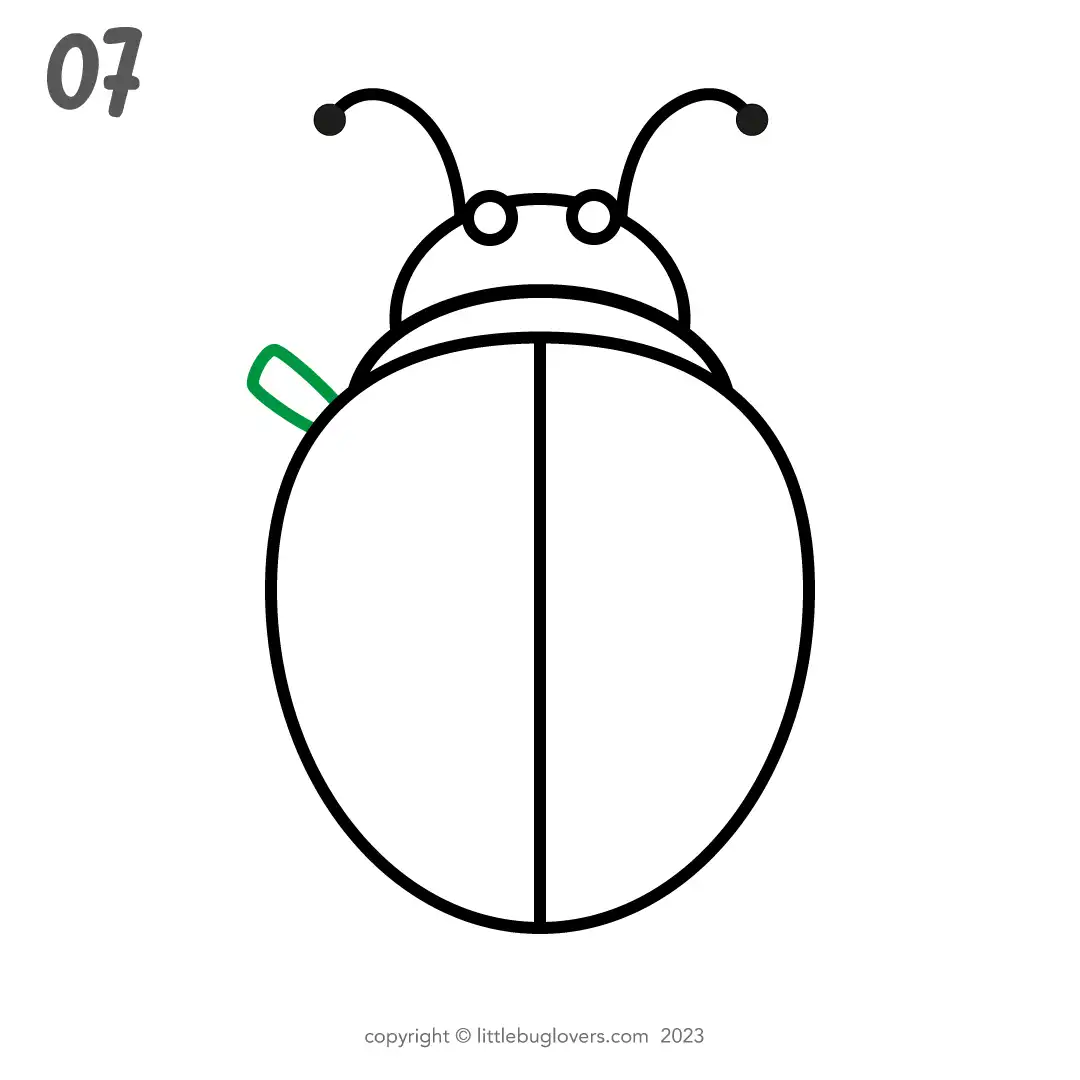
Our little ladybug is starting to find its footing! With the addition of the first part of a leg, it’s beginning to get ready to explore the world. Let’s see how to create that:
Just slightly below where the head and the body meet, begin drawing the very first segment of the ladybug’s leg. This is on the ladybug’s left side (as we are looking down on her).
The shape is a simple, slightly curved line extending outward from the body. You can make this first segment thinner at the body and wider at the end where it joins to the second part.
Placing this leg here makes sure our ladybug looks super steady on its feet and ready to dance! 💃
Awesome progress! Once all the legs are drawn, our ladybug drawing will be ready to crawl, explore, and maybe even dance! Keep it up! 🐞💃🕺
Step 08: Legging It Forward!

Our ladybug is inching closer to being mobile! This step involves refining the first leg segment we started with, giving it more structure and character. Let’s crawl into how to draw it:
Starting from the end of the first leg segment you drew in the previous step (the left side of the ladybug from our viewpoint), draw another slightly curved line. This line will represent the next section of the ladybug’s leg.
Keep the length similar to the initial leg segment to keep the sizes similar.
The slight curve of this segment follows the natural curvature of the ladybug’s body. This gives the leg a more dynamic and natural look.
The ladybug drawing becomes more lifelike and animated with each leg segment you add. Keep drawing, and soon enough, our little bug friend will be ready to embark on its adventures! 🐞🌱🌼
Step 09: Completing the First Leg! 🌟

We’re making steady progress! This step brings our ladybug one step closer to standing on its own. Here’s how to draw the final segment of the first leg:
Draw a slightly curved line from the end of the second leg segment (the point you left off in the previous step). This line represents the last section of the ladybug’s leg, leading to its foot.
This segment should be a bit shorter than the previous two segments, giving the leg a tapered appearance.
The end of this segment can be slightly rounded to signify the ladybug’s foot.
This completes the first leg of our ladybug! By breaking down each leg into three distinct segments, we’re able to capture the details of a ladybug’s anatomy in a simple and cute manner.
With this leg finished, our ladybug is starting to come to life! Keep up the good work, and continue to draw the rest of the legs and details. 🐞🎨🖌️
Step 10: Drawing the Second Leg!

Great job on the first leg! Now, it’s time to move on to the second one. Let’s give our ladybug another leg to stand on:
Start just below the ladybug’s head and draw a slightly outward and downward slanting line. This forms the first segment of the second leg.
From the end of the first segment, draw a similar line but slightly angled inwards. This will serve as the second segment of the leg.
As highlighted in green, this segment should have a slight curve and be similar in length to the first segment.
The green colour makes it super easy to visualise the next steps in the drawing process. With these two segments in place, the next step will likely focus on completing this leg. Keep following the steps, and soon, our ladybug will have all its legs! 🐞🖌️🎨
🌟 Step 11: Drawing the Third Leg! 🌟

Fantastic! We’re progressing nicely. Let’s get our ladybug another step closer to being complete:
For the third leg, begin slightly below and to the right of the ladybug’s head. This positioning ensures the legs are distributed proportionally.
Draw a slightly outward and downward slanting line, similar to how you did with the previous legs. This is the first segment of the third leg.
From the end of the first segment, as indicated in green, extend another segment that angles slightly inwards. This will be the second segment of the leg.
Remember, using the green highlight as a guide will help keep consistency and symmetry in your drawing. Keep it up; soon, our ladybug will be ready to explore the garden! 🐞🎨🍀
Step 12: Mirroring the Legs on the Other Side!

Well done on reaching this step! Our ladybug is almost ready to roam.
Begin by focusing on the uppermost leg on the right side of the ladybug drawing.
Mirror the shape and positioning on the left side, using the green highlighted area as a guide. Make sure to start the first segment close to the ladybug’s head, slightly slanting upwards and outward.
For the middle leg, replicate the length and curve as you did for the right side, positioning it slightly below the first leg.
Draw the bottom leg just like the one on the opposite side. Make sure it’s like its twin and not too close or too far away. Matching leg buddies!
Remember, symmetry is essential! Aim to get the legs on the left side as similar as possible to those on the right side to ensure balance in your drawing.
Almost there! Keep up the fantastic work, and soon, our ladybug will be complete! 🐞✍️🌺
🌟 Step 13: Decorating Our Ladybug with Spots! 🌟

Our ladybug is nearly complete, but it’s missing its iconic spots! Here’s how to add them:
Center Circle: Begin by drawing a large spot right at the centre of the ladybug’s body. This will be the primary focal point.
Upper Spots: Move to the top segment of the ladybug’s back. Draw two medium-sized spots, one on each half of the ladybug’s back, keeping them looking the same on each sid.
Middle Spots: Below the central spot and on either side of the body, sketch two slightly smaller spots. These should be near the middle of each half.
Lower Spots: Finally, add two more spots at the bottom segment of the ladybug’s back. These should be slightly smaller than the middle spots. Try and be symmetrical.
Spacing: Ensure that there’s an even gap between the spots and that they aren’t too close to the edge of the ladybug’s body or the centre line.
Voilà! Your ladybug now sports its signature spots and is ready to spread its charm. Keep practising, and remember, every artist has their unique touch. Celebrate yours! 🐞🖌️🎉
NOTE: you don’t have to have the spots the same on both side. You can go crazy and put spots wherever you want! … it’s your design little artist.
🎨 Step 14: Bringing Color to Our Ladybug!

Alright, mini-art masters! Get ready for the magical touch! In step 14, we’re diving into the world of colours. Grab your favourite shades and let’s make our ladybug come alive. It’s time to give our little bug buddy some dazzling insect colours! 🎨
Now that our ladybug has taken shape, it’s time to make it vibrant with colours!
Black Base Color: Begin with the black areas, such as the ladybug’s head, antennae, and legs. The spots on its back are also filled in with black, giving it the iconic appearance that ladybugs are known for.
Red Wings: While this step primarily showcases the black fill, you’ll likely be colouring the wings in the next stages. Ladybugs are typically red with black spots but can also come in orange or yellow varieties. Choose a shade you prefer, but the classic choice is a bright, eye-catching red.
When filling in the colours, Try not to go over the lines, but it doesn’t matter if you do, as long as you are having fun doing insect art!
Shading: If you’re feeling advanced, you can add some light shading on the edges of the ladybug’s body to give it a more three-dimensional appearance.
Prepare your colours and get ready to bring this little creature to life! 🐞🎨🌈
🌟 Step 15: Focusing on the Neck Fill 🌟

Ok bug lovers, let’s fill in that chubby little neck. The ladybugs neck is usually black, matching its head, antennae, and legs, a classic insect look.
Details Matter: If you want to add a touch of realism, you can add tiny white or light grey spots to represent the fine hairs ladybugs have on their neck and body.
Continue your colouring journey and make your ladybird look vibrant and lifelike! 🐞🎨
🌟 Step 16: Filling in the Head 🌟

Hey little artists! 🖍️🐞 Time to colour our ladybug’s head! Here’s how we can make it look super cool:
Choosing Our Crayon: Did you know ladybugs wear black hats? Let’s grab our black crayon for this part!
Let’s Get colouring: Time to colour in our ladybug’s head! Make it nice and even, like you’re painting a masterpiece. And remember, try to stay inside the lines to make it look super neat!
Watch Out for Those Eyes: While you’re colouring, don’t forget about the eyes or any tiny bits that aren’t black. If you haven’t drawn the eyes yet, don’t worry! We can add them after we finish the head.
Shadows Can Be Fun (If You Want): Want to make your ladybug look even more real? Grab a light grey crayon and gently colour the bottom of the head. It’s like adding a tiny shadow!
Keep going, superstar! 🌟 You’re doing awesome! After this, we’ll keep adding more fun details to our ladybug. Keep up the great work, and happy colouring! 🐞🖌️
🌟 Step 17: Filling in the Legs 🌟

Alright, kiddos! 🎨🐞 Let’s dance into colouring those leggy-legs of our ladybug!
Pick Your Crayon: Ladybugs usually wear black shoes on their legs! But hey, if you’re feeling wild, let’s make a disco bug and choose any colour you like! 💃🐞
Colouring Time: Ready, set, colour! Make sure each leg looks smooth and even. And remember to stay within those lines. If your ladybug has bendy legs, colour each part nice and even.
Tiny Details Alert: Keep an eye out for any small details on the legs. Maybe there are tiny hairs or cool spikes? Use the pointy end of your crayon or colour pencil for these little bits.
Add Some Shadow (If You Like): Want to make your ladybug’s legs look super real? Grab a light grey crayon and gently colour one side of each leg. It’s like a cool little shadow!
Great job, little artist! 🌟 After this, we’ll keep adding more fun details to our disco ladybug. Keep rocking and happy colouring! 🎶🐞🎨
🌟 Step 18: Filling in the Red Body 🌟

Let’s turn our ladybug colourful and lively! Here’s how:
Pick the Perfect Color: Did you know ladybugs love wearing red or orange dresses? Grab your brightest red crayon or marker for this fun step!
Colouring Time: Let’s colour in our ladybug’s dress, but remember to leave those black dots alone. They’re like the ladybug’s cool polka dots!
Watch Out for the Dots: Be super careful around the black dots. We don’t want our red dress to smudge them!
Add Some Shadows (If You Want!): Want to make your ladybug look super 3D? Pick a slightly darker red or maybe a light brown, and colour the sides a bit. It’s like giving your ladybug a little hug with colour!
Double-Check Your Work: After colouring her red dress, check if there’s anything else you want to colour or fix.
And wow! 🌟 Look at your colourful ladybug! She’s looking fabulous! Keep going and add any extra magic touches you want. Great job! 🐞🖌️
Did you know that ladybugs come in a variety of different colours?
🌟 Step 19: Adding a Highlight (For the Brave Artist) 🌟

Hey little artists! 🎨✨ Ready to make your ladybug sparkle and shine? Let’s add some magical highlights to our cool bug buddy! 🐞💫
Choose a Super Sparkle Color: Let’s grab a bright white or soft snowy colour. This will make it look like the sun is shining right on our ladybug!
Where’s the Sun? Think about where the sunlight is shining from. Maybe from the top-left or top-right? That’s where our ladybug will get its shine!
Time to Sparkle: Depending on where your sun is, draw a little glowy spot (like a tiny moon or a shiny dot) on the top part of our ladybug. This will make it look like the sun is giving our bug a little kiss!
Smooth and Glow: If you’re feeling adventurous, you can make your shiny spot soft and glowy by blending the edges a bit. This way, it looks like a gentle glow and not a sticker!
Try More Sparkles: Feeling like a pro? Add tiny glows on the ladybug’s head or even its tiny legs. But remember, sometimes a little sparkle goes a long way!
Take a Peek: Step back and look at your masterpiece. If you need to, you can move the sparkle to make it just right.
And there you have it! With a highlight, your ladybug drawing should now have an added layer of depth and shine. It’s a little effect, but really brings it to life, High five! 🐞✨
🌈✨🐞 BONUS: Let’s Get Super Silly with Color! 🐞✨🌈
Ready, Set, Go Wild!:
Hey there, awesome artist! Did you know that drawing is like a magic trick? You can turn anything into whatever you dream! Instead of the usual red and black, let’s make our ladybugs super colourful and fun!
Look at this stripey ladybug! It’s like it’s wearing its own rainbow dress. 😃

Pick Your Favourite Colours: What colours make you smile? Bright blues, sunny oranges, or maybe chocolatey brown? Grab them all!
Decide Your Design: Think about the stripes! Do you want them to go up and down like a ladder? Or side to side like a rainbow? In our cool picture, they’re standing tall!
Start Colouring! Fill in those stripes! Remember, it’s okay if it’s not perfect. It’s YOUR special art!
Not Just Stripes!: Guess what? You can try more than just stripes! How about changing the shape of the actual spots! Check out this cute heart design

Or stars like the night sky? Or even wiggly worms? 🌟🐍

Show and Tell! Once you’ve made your masterpiece, show it to everyone! Maybe even tell a story about your colourful bug. Was it invited to a bug party? Or did it get its colours from a magic rainbow?
Final Fun Thought:
Drawing is like having a magic wand. You can change anything into a wild, fun, and super silly picture! So grab those colours, and let’s make more magical creatures! 🌟🎨🌈🐞
If you want to learn all about ladybugs and how they live, then click here!


